
O b j e c t i v e s
After reading this chapter, you should be able to perform the following tasks:
↠ Describe how
↠ spreadsheets are used by engineers.
↠ Identify the main components on the Excel screen.
↠ Name at least two ways to access help for Excel.
↠ Create and save a new worksheet.
↠ Open and edit an existing worksheet.
↠ Undo mistakes.
↠ Perform spelling checks on text items.
↠ Preview and print a worksheet.
Microsoft Excel Basics
1.1 INTRODUCTION TO WORKSHEETS
Spreadsheet application projects were initially expected to be utilized for money related counts. A cell may contain numerical data, textual data, or formulas (equations).
Spreadsheet application projects were initially expected to be utilized for monetary estimations. The original electronic spreadsheets resembled the paper spreadsheets of an accountant. One characteristic of electronic spreadsheets that gives them an advantage over their paper counterparts is their ability to automatically recalculate all dependent values whenever a parameter is changed.
Over time, more and more functionality has been added to spreadsheet programs like Excel. An assortment of scientific and building capacities currently exists inside Excel. Numerous analytical tools are also available, including scientific and engineering tools, statistical tools, data-mapping tools, and financial analysis tools. Auxiliary functions include a graphing capability, database functions, and the ability to access the Internet.
As an engineering student, you may find that an advanced spreadsheet program such as Microsoft Excel will suffice for many of your computational and data presentation needs. You will still need a word processor, such as Microsoft Word, for working with reports and other documents, but tables and charts may be easily exported from Excel into Word.
Excel also has some capability for database management. However, if you wish to manage large or sophisticated databases, a specialized database an application such as Microsoft Access or MySQL is preferable.
In addition, Excel has fairly sophisticated mechanisms for performing mathematical and scientific analyses. For example, you can use the Analysis Toolpack in Excel to perform mathematical analysis. If the analysis is large or very sophisticated, however, you may want to use a specialized mathematical or matrix package such as Mathcad® or Matlab®.
The same principles hold for graphing or statistical analysis. Excel is a general tool that performs many functions for small- to medium-sized problems. As the size or sophistication of the function increases, other tools may be more applicable, such as SigmaPlot® or Origin® for graphing and SAS® or SPSS® for statistical analysis.
Microsoft Excel utilizes the term worksheet to indicate a spreadsheet. A worksheet can contain more types of items than a traditional paper spreadsheet. These include charts, links to web pages, Visual Basic programs, and macros. We will treat the terms worksheet and spreadsheet synonymously in this content. Worksheets put away together in a record are known as an exercise manual.
1.2 HOW TO USE THIS BOOK
This book is intended to get you, the engineering student, up and running with Excel 2007 as quickly as possible. (References to Excel 2003 are provided as well.) Examples are geared toward engineering and mathematical problems. Try to read the book while sitting in front of a computer. Learn to use Excel by re-creating each example in the text. Perform the instructions in the boxes labeled PRACTICE.
The book is not intended to be a complete reference manual for Excel. It is much too short for that purpose. Many books on the market are more appropriate for use as complete reference manuals. However, if you are sitting at the computer, one of the best reference manuals is at your fingertips. The online Excel help devices give a phenomenal asset if appropriately utilized. These helpful tools are described later in this text.
1.3 TYPOGRAPHIC CONVENTIONS USED IN THIS BOOK
Throughout the text, the following conventions will be used:
Selection with the Mouse
The book frequently asks you to move the mouse cursor over a particular item and then click and release the left mouse button. This action is repeated so many times in the text that it will be abbreviated as follows:
Choose Item.
If the mouse button should not be released, or if the right mouse button should be used, then this will be stated explicitly.
A button, icon, or menu option that you should select with the mouse will be printed in boldface font. A key you should press will also be printed in boldface font. For example, if you are asked to choose an item from the options shown at the top of the screen, then it will be written as follows:
Choose Paste from the Ribbon’s Home tab.
Multiple Selections
The book frequently refers to selections that require more than one step. For example, to format a group of cells, perform the following steps:
1. Choose Cell Styles from the Excel Ribbon.
2. Choose Normal style from the drop-down menu.
Multiple selections will be abbreviated by separating choices with the right arrow. For example, the two steps listed will be abbreviated as follows:
Choose Cell Styles → Normal from the Ribbon.
Multiple Keystrokes
If you are asked to simultaneously press multiple keys, the key names will be printed in bold font and will be separated with a plus sign. For example, to undo a typing change, you can simultaneously press the Ctrl key and the Z key. This will be abbreviated as follows:
Press Ctrl + Z.
Key Terms
The first time a key term is used, it will be italicized. Key terms are summarized at the end of each chapter.
Literal Expressions
A word or phrase that is a literal transcription will be printed in bold. For instance, the title bar at the highest point of the screen ought to contain the content Microsoft Excel. Another example is the literal name of a box or menu item, as in the following instruction:
Check the box labeled Equal To.
1.4 UNDERSTANDING THE EXCEL 2007 SCREEN
This section introduces you to the Microsoft Excel screen. To start the Excel program, use the Windows Start menu (illustrated in Figure 1.1):
Start →Microsoft Office Excel 2007
A screen that resembles Figure 1.2 will appear.
 |
| Figure 1.1 ↠ Launching Excel from the Start Menu. |
Microsoft Excel Basics
 |
| Figure 1.2 ↠ The Excel WorkBook. |
We’ll now discuss each of the components on the screen. The Excel screen comprises of various segments, including the accompanying:
• Title Bar
• Ribbon (Menu Bar in Excel 2003)
• Quick Access Toolbar
• Office Button
• Formula Bar
• Work Area
• Sheet Tabs
• Status Bar
Try to become familiar with the names of these components as we proceed, as we will use these names throughout the book. Working generally from top to bottom, we will discuss each of the components in turn.
1.4.1 Title Bar
The bar at the highest point of the screen is known as the Title bar. The Title bar contains the name of the worksheet presently being altered, Ch01.xlsx in Figure 1.2. If you are working in an unsaved workbook, the default name Book1 will appear in the Title bar. Figure 1.3 shows an example of a Title bar. The Title bar contains a number of useful buttons and features (from left to right):
 | |
|
• Office Button—The enormous round catch at the left part of the bargain bar is the Office catch.
It is present in all Microsoft Office 2007 applications and replaces many of the features that used to be on the File menu in Excel 2003. It is used to
❍ Open workbooks
❍ Save workbooks
❍ Print workbooks
❍ Set Excel Options
• Quick Access Toolbar—The small collection of buttons just to the right of the Office button is the Quick Access Toolbar. This area is designed for your use, to add buttons for the features that you use most often. The small down arrow to the right of the Quick Access Toolbar opens a menu that you can use to customize the toolbar.
• File Name—The name of the workbook that is being edited is displayed in the center of the Title bar when the workbook has been maximized to fill the entire work area. If the current workbook is not maximized, then it will be displayed in its own window in the work area, with the file name shown at the left side of the exercise manual window's Title bar, as represented in Figure 1.4.
• Control Buttons—The three buttons at the right side of the Title bar are called the Control buttons. They are used to control the way the Excel window is displayed.
❍ Minimize Button—The small flat line is the Minimize button. If you click the minimize button the Excel window will disappear from your desktop, except for the Excel icon on the Taskbar, usually at the bottom of the desktop. Click the Taskbar icon to restore the Excel window on your screen.
❍ Maximize/Restore Window Toggle Button—The middle button is a toggle button that changes the display back and forth between two options.
❍ If the window is not maximized, then the middle button maximizes the window (causes it to fill the entire desktop).
 |
| Figure 1.4 ↠ Multiple workbooks can be open in the work area. |
❍ If the window is already maximized, then the middle button restores the window to whatever size it was before it was last maximized.
❍ Close button—The rightmost button on the Excel Title bar is the Close button (shaped like an x). Shutting the Excel window is proportionate to leaving the Excel program. If you have made changes to the workbook you will be asked if you want to save the workbook before exiting.
1.4.2 Ribbon
The Ribbon is a new feature in Office 2007, and it replaces the menu bar, most toolbars, and some dialog boxes. The Ribbon attempts to get everything you need to use Excel right where you can get at it quickly. It is context-sensitive so that when you are editing a chart, the Ribbon tabs related to working with charts are activated. The Ribbon can be minimized, as shown in Figure 1.4, but it is more commonly used in the expanded form shown in Figure 1.5.
 |
| Figure 1.5 ↠ The Ribbon's Home Tab |
The Ribbon is comprised of various tabs:
• Home tab—very commonly used commands for formatting and sorting.
• Insert tab—used to insert objects such as charts and hyperlinks.
• Page Layout tab—used to modify entire sheets (apply themes, set print area, etc.).
• Formulas tab—used to embed capacities and oversee characterized names of cells and cell ranges.
• Data tab—provides access to sorting and filtering features and to data analysis tools (if activated).
• Data tab—provides access to sorting and filtering features and to data analysis tools (if activated).
• Review tab—used to add comments and track changes to a worksheet.
• View tab—used to change the display magnification (zoom), and to show or hide features such as the Formula bar and gridlines.
• Developer tab—provides access to the Visual Basic editor and macros; by default, not displayed.
• Add-Ins tab—not displayed unless you have installed Excel Add-Ins. Excel Add-Ins are programs written for Excel by other software companies that are intended to extend the capabilities of Excel.
Most of the features you will need for day-to-day problem solving will be on the Home tab.
Every tab is separated into gatherings of related catches, determination records, and menus. For example, the Font group on the Home tab (shown in Figure 1.5) contains drop-down lists for font size and style, toggle buttons for font attributes (bold, italic), and combination buttons (buttons with a small down arrow on the right side) for setting background (fill) and font colors. Clicking the button applies the color shown on the button. Clicking the down arrow opens a color palette so that you can select a color.
When this text instructs you to use a Ribbon option, it will be in the following general form:
Tab →Group →Drop-down Menu →Button
1.4.3 Formula Bar
The Formula bar, located just below the Ribbon, displays the formula (or text, or value) in the currently selected cell (called the active cell). In Figure 1.6, cell B3 is the active cell, and it contains the formula
= 3 + 4
When cell B3 is selected, the result of the calculation is displayed in the cell (as shown in Figure 1.6) and the cell contents (the formula) are displayed in the Formula bar.
 | |
|
When you are entering a formula, you can type in the Formula bar or type directly into the cell that will hold the formula. Most people enter formulas directly into the cells, but the Formula bar can be useful when you are entering a formula in a cell near the right edge of the work area.
The left half of the Formula bar is known as the Name box. The Name box shows the name of the dynamic cell. In Figure 1.6 the Name box appears in the top-left corner and displays “B3” since that is the active cell.
The Insert Function catch likewise dwells on the Formula bar. The icon on the Insert Function button shows fx, a common nomenclature for “function.”
Click in cell C3 to make it the active cell, then click on the Insert Function button. The Insert Function dialog box will appear, as shown in Figure 1.7. From the Insert Function dialog box, you can choose a function category and function name. In Figure 1.7, we have chosen the category Math & Trig and the function of SIN.
Near the bottom of the Insert Function dialog box, a brief description of the function is displayed. The dialog box also has a search feature to help you locate a function. There are over 200 built-in functions available in Excel.
Choose the SIN function, then click OK. The Function Arguments dialog box will appear, as shown in Figure 1.8. This dialog prompts for the arguments to the named function. Arguments may be a range of cells, numbers, or other functions.
A short explanation about the expected arguments appears in the bottom of the window. In this case, the SIN function takes its arguments in radians. The formula for converting radians to degrees is also displayed.
 |
| Figure 1.7 ↠ the Insert function dialog box. |
 |
| Figure 1.8 ↠ The Function Arguments dialog box for the SIN Function. |
Type
pi()/2
as the Number argument. The effect of this is to call another built-in function, named PI (returns the value of ), and divide the result by 2.
When you click OK the Function Arguments dialog box will disappear and the formula
=SIN1PI1 2/22
will be entered into the active cell (cell C3). This is illustrated in Figure 1.9.
 |
| Figure 1.9 ↠ The Formula = SIN(PI()/2) entered in cell C3. |
1.4.4 Work Area
The Work area (also called the Workbook window) is the area on the screen where data are entered and displayed. The Work area contains one or more worksheets.
The maximum size for a worksheet is 1,048,576 rows by 16,384 columns (Excel 2003: 65,536 x 256). The columns are labeled A, B, C, ..., AA, AB, ..., AAA, AAB, ..., XFD, and the rows are labeled 1, 2, 3, ..., 1048576.
A single cell can be selected by placing the mouse over the cell and clicking the mouse. The selected cell is called the active cell. A range of cells can be selected by holding the left mouse button down and dragging it over the selected cell range. When a cell range is selected, the first cell selected is the active cell. In Figure 1.10 the cell range B2: C4 is selected, and cell B2 is the active cell.
 |
| Figure 1.10 ↠ Selected cell range B2: C4, with active cell B2. |
1.4.5 Sheet Tabs
The Sheet tabs are situated at the base of the showed worksheet, as appeared in Figure 1.11. You can have more than one worksheet in an exercise manual. The Sheet tabs recognize the majority of the worksheets in the present exercise manual.
 |
| Figure 1.11 ↠ The Excel window with the Sheet Tabs indicated. |
The rightmost Sheet tab is actually a button that can be used to add a new worksheet to the workbook.
1.4.6 Status Bar
The Status bar is normally positioned at the very bottom of the Excel screen. The status bar shows data about a direction in advancement and demonstrates some total qualities for a chose cell go. In Figure 1.12, the Status bar shows that Excel is in Ready mode (ready for data entry). When multiple cells are selected, the average, count, and sum of the selected values are displayed in the Status bar. Rightclick on the Status bar to customize the display.
 |
| Figure 1.12 ↠ The Status bar shows the current data entry mode (Ready), and some aggregate statistics about selected values. |
Excel contains a large online help system. To access the Help menu, click the Help button on the right side of the Ribbon, as indicated in Figure 1.13. (Exceed expectations 2003: pick Help from the menu bar.) The Excel Help window will open, as appeared in
The Help window provides several ways to obtain help, including:
• Browsing the Help Topic List.
• Searching the Help system.
Each of these methods will be discussed in the next sections.
| Figure 1.13 ↠ The Help button is located on the right side of the Ribbon. |
 |
| Figure 1.14 ↠ The Excel Help window. |
This method is useful if you have time to read about a general topic. Reading through a topic could serve as a tutorial and may provide related information that can expand your skill base, but it is not the method to use if you have a specific question and you want an immediate answer. To see a Help subject, basically, select the title in the Browse Excel Help list.
In Excel 2003, open the Table of Contents using these steps:
1. Pick Help →Microsoft Excel Help from the menu bar (or press F1.) The help Task pane will be displayed.
2. Click the Table of Contents link on the Task pane.
Note: Excel 2007 users can also open the Table of Contents in the Excel Help window, but the topics in the Table of Contents are exactly the same as the topics in the Browse the Excel Help list.
1.5.2 Searching the Help System
While the Browse Excel Help list and Table of Contents provide general information about help topics, the quickest way to find answers to specific questions is to search the Excel help system. Simply type a keyword or a question into the search box, shown in Figure 1.14. (Exceed expectations 2003: There are search fields on the Help Task sheet, and on the Menu bar.) You enter a keyword or a question in the search field to search the Help system. Figure 1.15 illustrates the result of searching for the help system for the word “sine.” Notice that the term “sine” was found in four Help topics. Clicking on any of the Help topic titles will cause the topic to be displayed.
 |
| Figure 1.15 ↠ Results from searching for ”sine” in the Help system. |
1.6.1 Creating a New Workbook
When the Excel application is started, a blank workbook containing (by default) three worksheets are automatically created. To create another new workbook, follow these steps:
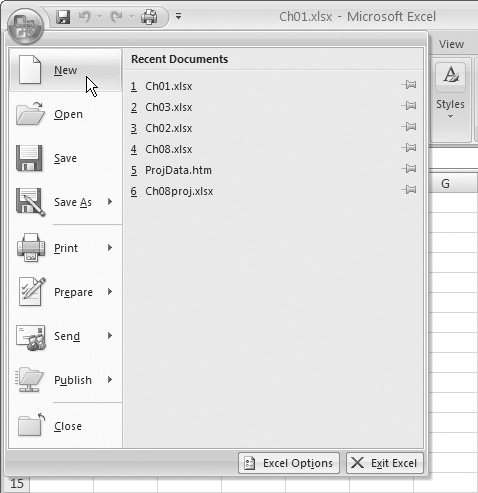
1. Click the Office button to open the Office menu shown in Figure 1.16.
2. Click the New button. The New Workbook exchange box will open, as appeared in Figure 1.17.
3. Snap the Blank Workbook symbol to choose it, at that point click the Create catch to make the new exercise manual. (Or, double-click the Blank Workbook icon.)
(Excel 2003: Use File → New, then choose New → Blank Workbook from the Task pane.)
1.6.2 Opening an Existing Workbook
To open an existing workbook, do the following:
1. Click the Office button to open the Office menu, shown in Figure 1.18.
2. Click the Open button. The Open dialog box will be displayed (Figure 1.19). (Excel 2003: Choose File → Open from the Menu bar.)
3. Browse for the file you want to open. In this example, a workbook named Ch01.xlsx has been selected.
4. Click Open to open the file in Excel.
 |
| Figure 1.16 ↠ The Office menu with New button selected. |
 |
| Figure 1.17 ↠ The New Workbook dialog. |
 |
| Figure 1.18 ↠ The Office menu with the Open button selected. |
New Excel file extensions
Prior to Excel 2007, the file extension for an Excel file as .xls.With Excel 2007, two new file extensions are being used:
• .xlsx—the default filename extension, macros disabled.
• .xlsm—macro-enabled workbook.
The .xlsx file name extension indicates that macros (and Visual Basic programs) have been disabled. This ensures that the workbook cannot transmit a macro virus. If the file you want to open uses the .xlsm file extension, macros and Visual
 |
| Figure 1.19 ↠ The Open dialog box. |
1.6.3 Creating a New Worksheet
Within a workbook, you can have many worksheets. The number of worksheets that you can have in a single workbook is limited only by the available memory on your computer.
To create a new worksheet in an open workbook, click the Insert Worksheet a button that is the rightmost Sheet tab (See Figure 1.20.) (Excel 2003: Choose Insert→ Worksheet from the Menu.)
 |
| Figure 1.20 ↠ The Insert Worksheet button on the Sheet tab row. |
• Lab Data
• Report
• Charts
 |
| Figure 1.21 ↠ Using worksheets to organize your work. |
1. Double-click on the worksheet tab to select the tab and enter text entry mode.
2. Type the new worksheet name.
3. Snap anyplace outside the worksheet tab to finish the content section.
A template is a workbook that has some of its cells filled in. If you use similar formatting for many documents, then you will benefit from creating and using a template. You may build your own template or customize preformatted templates and, in time, create a library of your own templates. Excel is installed with a number of sample templates, including one that creates a Loan Amortization Schedule. To open the Loan Amortization template, follow these steps:
Excel 2007
1. Click the Office button to open the Office menu.
2. Click the New button to open the New Workbook dialog box, shown in Figure 1.22.
3. Choose Installed Templates from the Templates list.
4. Select Loan Amortization from the Installed Templates list.
5. Click the Create button to open the template.
Excel 2003
1. Choose File → New from the Menu bar. The New Workbook task pane will be displayed.
2. Pick On my Computer ... from the Templates segment. The Templates dialog box will open.
3. Choose the Spreadsheet Solutions panel.
4. Select the Loan Amortization template.
 |
| Figure 1.22 ↠ Choosing an installed template. |
The Loan Amortization template is a preassembled worksheet. Fill in the blank cells labeled
• Loan amount $15,000 in this example
• Annual interest rate 5%
• Loan period in years 4 years
• Number of payments per year 12
• Start date of loan 1/1/2009
 |
| Figure 1.23 ↠ A portion of the Loan Amortization Schedule. |
1.6.5 Opening Workbooks with Macros
A large scale is a short PC program that records a gathering of errands. Excel stores macros in a Visual Basic (programming language) module. Macros allow a set of frequently repeated commands to be stored and then executed with a single mouse click whenever needed.
Macros are very powerful tools. However, macros can contain a macro virus that will infect files on your computer. For this reason, you should only enable macros if you are certain of the origin of the macro. If you are unsure of the source of a macro, you should check the document by using virus-protection software before opening the document. Virus-protection software is not provided with Microsoft Excel and must be purchased separately.
In Excel 2007, there are now two file extensions used with workbooks:
• .xlsx—the default filename extension, macros disabled.
• .xlsm—macro-enabled workbook.
The default .xlsx filename extension tells you that macros (and Visual Basic programs) are disabled. This ensures that the workbook cannot transmit a macro virus. The .xlsm file extension means macros and Visual Basic programs are enabled; you should be careful when opening .xlsm files.
Because of the harm that can be done by macro viruses, Excel comes with Macro Security enabled. To check or change the degree of full-scale security on your establishment of Excel, pursue these means:
Excel 2007
1. Click the Office button to open the Office menu.
2. Snap the Excel Options catch at the base of the Office menu. The Excel Options exchange will open as appeared in Figure 1.24.
3. Choose the Trust Center panel.
4. Click the Trust Center Settings ... button (shown in Figure 1.24). The Trust Center dialog box will open.
5. Click Macro Settings. The present degree of security has appeared in the Macro Settings alternative rundown.
In Figure 1.25, the security is set so that macros are disabled, but you are notified (and have an option to enable it if desired).
 |
| Figure 1.24 ↠ The Excel Options dialog box, Trust Center panel. |
 |
| Figure 1.25 ↠ The Trust Center dialog box showing the current level of macro security. |
 |
| Figure 1.26 ↠ The Save As options. |
1. Choose Tools →Options from the Menu bar.
2. Choose the Security tab.
3. Click the Macro Security button. The Security dialog box will open.
4. Choose the Security Level tab.
The current level of protection is shown in the options list.
1.6.6 Saving Documents
The first time you save an Excel workbook, you need to assign the workbook a
name and choose a folder. To spare a record just because, pursue these means:
Excel 2007
1. Click the Office button to open the Office menu.2. Move the mouse over the Save As ... button. The Save a copy of the document options are displayed as shown in Figure 1.26.
3. Select one of the following Save options:
• Excel Workbook (.xlsx)— this is the default group in Excel 2007.
• Excel Macro-Enabled Workbook (.xlsm)—use only if macros or Visual Basic programs are stored with the workbook.
• Excel Binary Workbook (.xlsb)—rarely used except for very large workbooks.
• Excel 97-2003 Workbook (.xls)— utilized if similarity with more established renditions of Excel is required.
• Other Formats (e.g., HTML)—used to access various less-common formats such as .htm for web pages.
4. The Save As dialog will open as shown in Figure 1.27.
 |
| Figure 1.27 ↠ The Save As dialog box. |
6. Enter the workbook name in the File name field. In this example, “Ch01” was entered as the workbook name. You do not need to enter the file extension;
Exceed expectations will consequently include the document augmentation appeared in the Save as sort field (.xlsx in this model). 7. Click Save to save the workbook with the entered file name in the selected folder.
Excel 2003
1. Choose File →Save As from the Menu bar. The Save As dialog box will open.
2. Peruse for the ideal envelope to store the exercise manual.
3. Enter the workbook name in the File name field.
4. Click Save to save the workbook. To save an open document that was previously named, follow these steps:
Excel 2007
1. Click the Office button to open the Office menu.
2. Click the Save button to resave the workbook with any changes. Or on the other hand, click the Save catch on the Quick Access Toolbar.
Choose File →Save from the Menu bar.
You should save your work frequently. It is also important to make backup copies of your important documents on floppy disks, CDs, or some other physical device. There are many tales of woe from students (and professors) who have lost hours of work after a power failure.
1.6.7 The AutoRecover Feature
Excel has an automatic recovery feature, called AutoRecover, that can help protect your work from a power failure. When AutoRecover is on, Excel automatically saves a copy of your workbook periodically. Then, if there is a power failure or Excel crashes for any reason, you can open the most recent copy of your workbook to recover most of your work.
Note: AutoRecover files are erased each time you save your workbook, so using AutoRecover is not equivalent to creating backup copies of your important workbooks. The errand of making reinforcement duplicates is something that you should perform physically.
To check or change the AutoRecover features, follow this procedure:
Excel 2007
1. Click the Office button to open the Office menu.
2. Snap the Excel Options catch at the base of the Office menu. The Excel Options exchange will open as appeared in Figure 1.28.
3. Choose the Save panel.
 |
| Figure 1.28 ↠ The Excel Options dialog box, Save panel. |
5. Use every field to change the time interval. Excel 2003
1. Choose Tools→Options from the Menu bar. The Options dialog box will open.
2. Chose the Save tab.
3. If the box next to Save AutoRecover info is checked, then the AutoRecover feature is active.
4. Use every field to change the time interval. While you have the Options dialog box open, take some time to view the other useful options that may be customized. Browse through the other tabs on the Options dialog box. Until you become more familiar with Excel, you should probably leave most of the options set to their default values.
1.6.8 Naming Documents
It is important to develop a methodical and consistent method for naming worksheets. Over time, the number of worksheets that you maintain will grow larger, and it will become harder to locate or keep track of them. Documents that are related should be grouped together in a separate folder. Do not use the default workbook names (i.e., Book1, Book2, Book3, etc.), or chaos will soon ensue.
If documents are not given meaningful names, then the documents may be inadvertently overwritten. Documents that have very general names (e.g., Workbook), will be difficult to locate later.
One approach that students might use is to create a folder for each course and use the assignment number with a brief description as the workbook name. In the example shown in Figure 1.29, ENGR 101 might be a computer course and ENGR 262 a fluid mechanics course.
 |
| Figure 1.29 ↠ Using folders to organize homework files. |
File formats and file extensions
Prior to Excel 2007, the file extension for an Excel file as .xls. Exceed expectations 2007 has another document design just as new record augmentations (.xlsx and .xlsm). The new file format is called Office Open XML and it is intended to improve file management and data recovery. Excel 2007 users need to be aware that workbooks saved in the new format cannot be read in older versions of Excel. However, workbooks saved in Excel 2003 (or older versions) can be opened in Excel 2007.
A common scenario during a transition from one version of a program to another is that you may use a new version at school or work, and still have the older version at home (or vice versa). As long as you continue to use the older version of Excel, you will need to save your workbooks using the old format. The Save As an option on the Office menu provides an option to Save As Excel 97-2003 Workbook (shown in Figure 1.30). This ensures that older versions of Excel can open the saved workbook.
 |
| Figure 1.30 ↠ Saving a workbook for older versions of Excel. |
⧭
